Graphiques dans la gestion des déplacements
- Genesys Cloud CX 1, Genesys Cloud CX 2, Genesys Cloud CX 2 Digital, Genesys Cloud CX 3, Genesys Cloud CX 3 Digital ou licence Genesys Cloud CX 4.
- Complément d'information sur la gestion des trajets
- Créateur de gestion de parcours, Éditeur ou Visualisateur rôle
Les graphiques utilisent les données de Journey Management pour fournir une analyse des tendances, aider au dépannage et fournir des informations sur le comportement opérationnel et le comportement des clients. Vous pouvez créer des graphiques pour étudier, évaluer et passer en revue les indicateurs de parcours. Les graphiques vous permettent d'analyser les tendances dans le temps, de comparer des points de données, de suivre les progrès ou les changements et de comprendre vos clients.
Vous pouvez créer des graphiques à l'aide de données provenant de votre parcours précédemment construit.
Les graphiques aident les responsables des centres de contact, les gestionnaires de parcours, les responsables de l'expérience client et les analystes à :
- comprendre le parcours du client sur une période donnée
- comprendre les relations ou les corrélations entre différentes cartes d'événements
- comprendre l'impact sur le parcours global du client dans le centre de contact
- optimiser la performance du voyage, lorsqu'il y a eu un changement de performance
Filtres dans les graphiques
Les graphiques ne récupèrent que les données de la valeur du trajet. Si vous choisissez d'exclure certaines valeurs d'attributs, le graphique ne les inclura pas. Par ailleurs, si vous choisissez de n'inclure que certaines valeurs d'attributs, seules les valeurs incluses sont présentes dans le découpage du graphique.
Genesys Cloud applique aux graphiques les mêmes filtres que ceux que vous avez appliqués à pour le trajet.
- Vous pouvez créer jusqu'à 10 graphiques par trajet.
- Si vous dupliquez un trajet, Genesys Cloud duplique également les configurations graphiques du trajet.
Créer un graphique pour un voyage
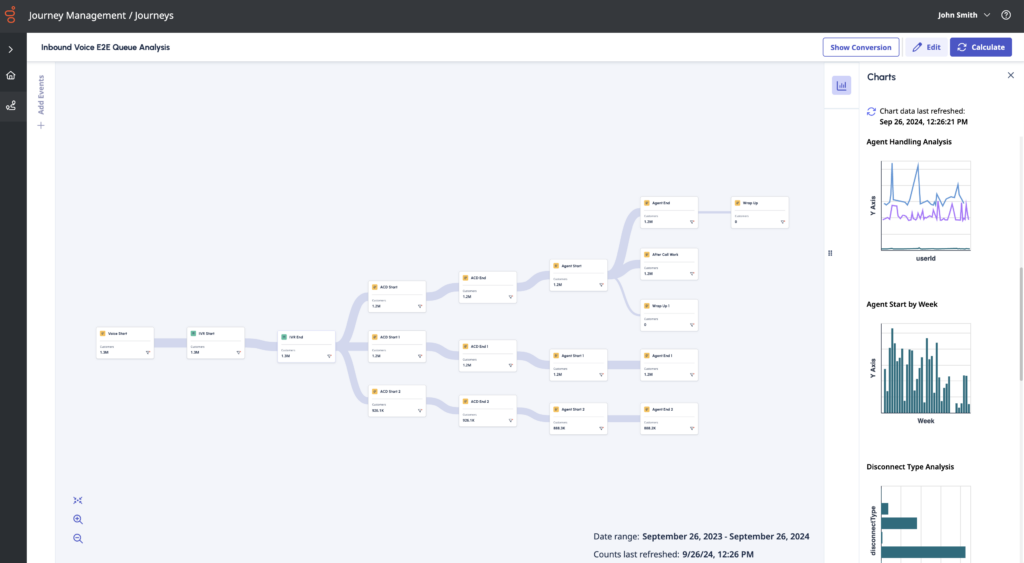
Dans la partie droite du canevas du voyage, vous pouvez visualiser les graphiques que vous avez créés. Les graphiques calculés affichent une vignette visuelle ; les graphiques qui doivent encore être calculés affichent le message Requires calculation .
Pour accéder à la configuration des graphiques, cliquez sur l'icône Charts dans le coin supérieur droit de l'écran. Cliquez sur un graphique pour obtenir une représentation visuelle détaillée.
Créer un nouveau graphique
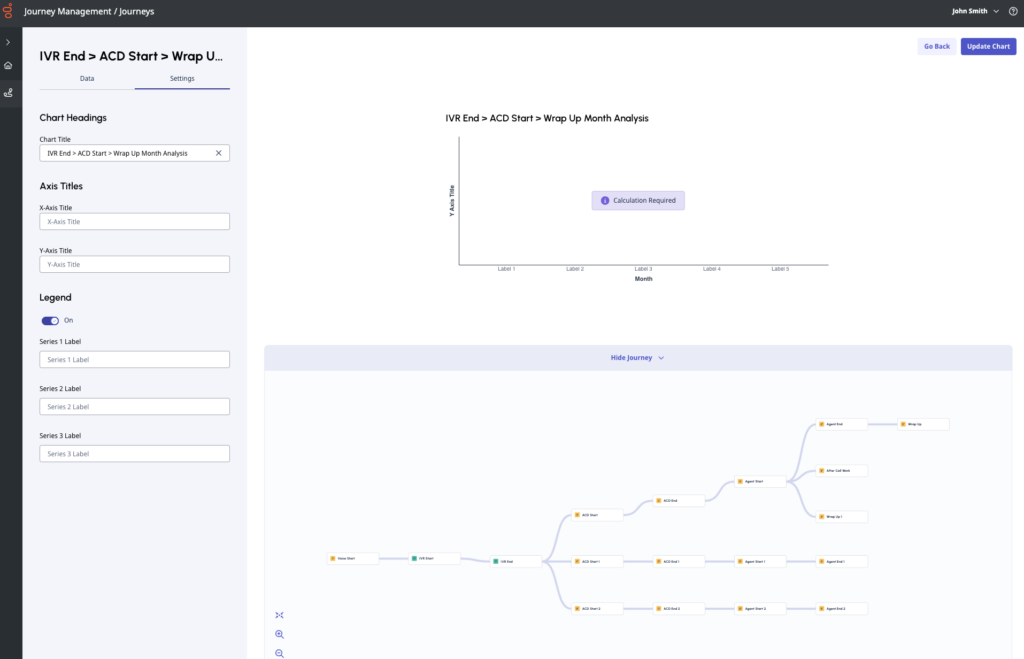
Cliquez sur Nouveau graphique. Genesys Cloud vous dirige vers l'écran de configuration du graphique. Votre voyage doit être en mode Edit pour que vous puissiez également éditer les cartes.
La partie gauche de l'écran de configuration de la carte vous permet de modifier votre carte ; la partie droite affiche la représentation visuelle de la carte et de votre trajet à titre de référence. Si vous ne voulez pas voir le trajet, cliquez sur Cacher le trajet.
- Les graphiques sont activés dès qu'il y a au moins un événement dans le parcours. Vous pouvez ajouter des graphiques au fur et à mesure que vous ajoutez et reliez des événements, ou vous pouvez d'abord créer le parcours qui vous intéresse, puis décider comment utiliser les graphiques pour soutenir cette analyse.
- Les fonctions Edit, Save, et Calculate régissent à la fois le canevas du voyage et l'éditeur de graphiques. Vous ne pouvez pas effectuer un calcul sur une carte sans effectuer un calcul sur l'ensemble du trajet. Par conséquent, Genesys Cloud recommande de créer le parcours, de l'enregistrer, puis de créer quelques graphiques correspondants avant d'effectuer un calcul.
Onglet Paramètres
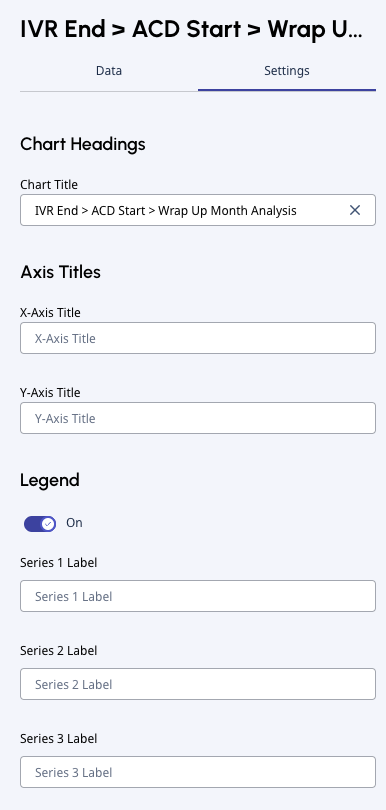
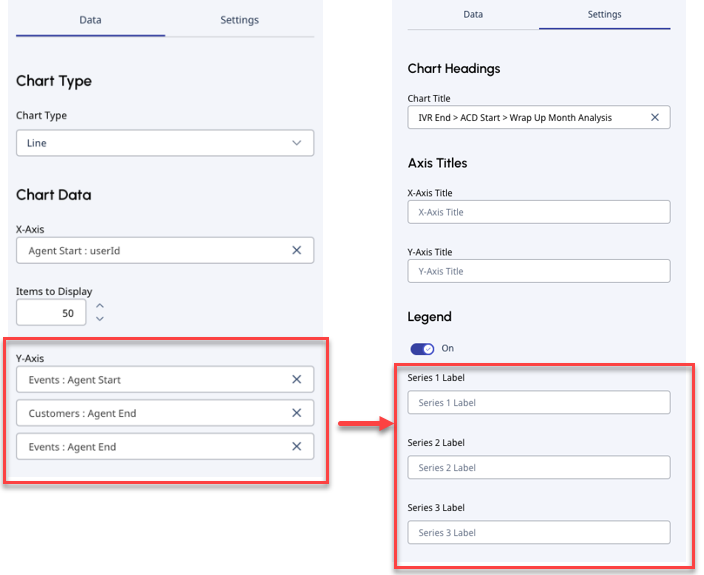
Définissez les titres des graphiques et les noms des étiquettes dans Settings.
- Entrez un nom pour le graphique dans le champ Titre du graphique.
- Saisissez les titres des axes dans Titre de l'axe X et Titre de l'axe Y.
- Basculer Légende activée ou désactivée.
- Si vous définissez les points de données de l'axe des Y sous l'onglet Data, vous pouvez mettre à jour leurs étiquettes dans Settings. Définissez les noms des étiquettes de la série . Vous disposez d'autant d'étiquettes Series que de points de données de l'axe Y que vous définissez sous l'onglet Data.
Onglet Données
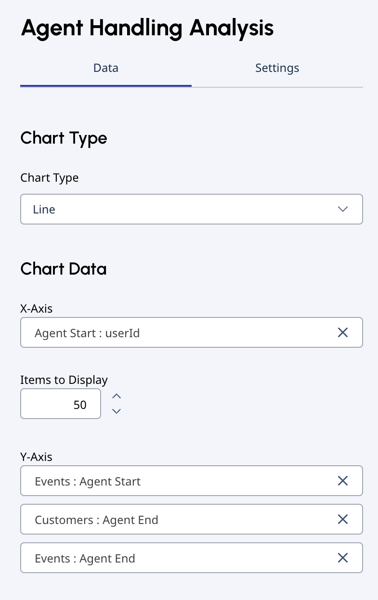
Vous pouvez définir le type de graphique et les données du graphique.
Type de graphique
Vous avez le choix entre trois types de graphiques : Colonne, Barre, Ligne.
- Genesys Cloud recommande d'utiliser des diagrammes à barres pour les données catégorielles, telles que les étiquettes.
- Si vous avez plus de deux variables et plus de 30 valeurs, Genesys Cloud vous recommande d'utiliser un graphique linéaire.
Données graphiques
Les graphiques de gestion des trajets vous permettent de compter les données relatives aux événements en fonction de l'heure et des valeurs des attributs. Vous pouvez afficher des clients ou des événements. Les clients sont les clients uniques qui répondent aux critères du tableau. Les événements sont le nombre total d'interactions qui correspondent aux critères du graphique.
- Les séries temporelles comprennent : le jour, la semaine, le mois ou l'année.
- Les valeurs des attributs comprennent : les valeurs par défaut et les valeurs définies par l'organisation.
Exemples de valeurs par défaut: direction, types de messages, motifs de déconnexion, type de transfert.
Exemples de valeurs définies par l'organisation: QueueID, flowID, userID (agents), intents, botID, wrapupCode.
- Définissez les points de données de l'axe X sous l'onglet Data.
- Valeurs par défaut pour Time:
Valeur temporelle Valeur par défaut jour Données des 28 derniers jours semaine Données des 12 dernières semaines Mois Données des 13 derniers mois Année Année civile et année civile précédente des données
Note: Vous pouvez sélectionner jusqu'à 50 éléments à afficher, ce qui vous permet d'augmenter n'importe quelle valeur de temps jusqu'à 50. - Valeurs par défaut pour Attribut: Genesys Cloud répertorie les 50 premiers labels.
Remarque :-
Si vous créez un graphique sur event:attribute selection sur l'axe des X d'un événement, vous ne pouvez configurer le graphique que sur cet événement spécifique, ou sur les événements qui viennent après cet événement spécifique dans le parcours. Il n'est pas possible de créer un graphique sur des événements qui ont précédé cet événement spécifique, ou qui ne sont pas sur sa trajectoire.
-
Toutes les valeurs d'attributs ne comportent pas de données. Pour plus d'informations, voir Filtres dans les graphiques.
-
- Valeurs par défaut pour Time:
- Définissez les points de données de l'axe Y : vous pouvez choisir Customers ou Events comme type de données. Sélectionnez le type de données dans la liste déroulante, puis l'événement correspondant.
- Si vous définissez des points de données sur l'axe Y, vous pouvez retourner sur Settings et mettre à jour leurs étiquettes. Sélectionnez les noms des étiquettes de la série . Vous disposez d'autant d'étiquettes de la série que de points de données de l'axe Y que vous avez définis.
- Si vous définissez des points de données sur l'axe Y, vous pouvez retourner sur Settings et mettre à jour leurs étiquettes. Sélectionnez les noms des étiquettes de la série . Vous disposez d'autant d'étiquettes de la série que de points de données de l'axe Y que vous avez définis.
- Cliquez sur Créer un graphique. Genesys Cloud vous ramène au canevas du voyage.
Vous pouvez choisir de créer un autre graphique ou d'effectuer un calcul.
Calculer les graphiques
- Ouvrez le trajet pour lequel vous souhaitez effectuer des calculs.
- Cliquez sur Calculer dans le coin supérieur droit.
- Genesys Cloud effectue un nouveau calcul sur le trajet et tous les graphiques associés.
Remarque : Le calcul peut prendre un certain temps.
Comprendre les résultats des graphiques
Pour ouvrir un graphique, cliquez sur l'icône Charts dans le coin supérieur droit du canevas du voyage.
Cliquez sur un graphique pour obtenir une visualisation détaillée.
Afficher les calculs des graphiques
- Si votre parcours est en mode Analyzer, cliquez sur View Chart Details pour voir la configuration du graphique. Vous ne pouvez pas modifier votre dossier dans cet état.
- Si votre trajet est en mode Edit, cliquez sur Editer la carte pour ouvrir l'éditeur de carte.
Exemples
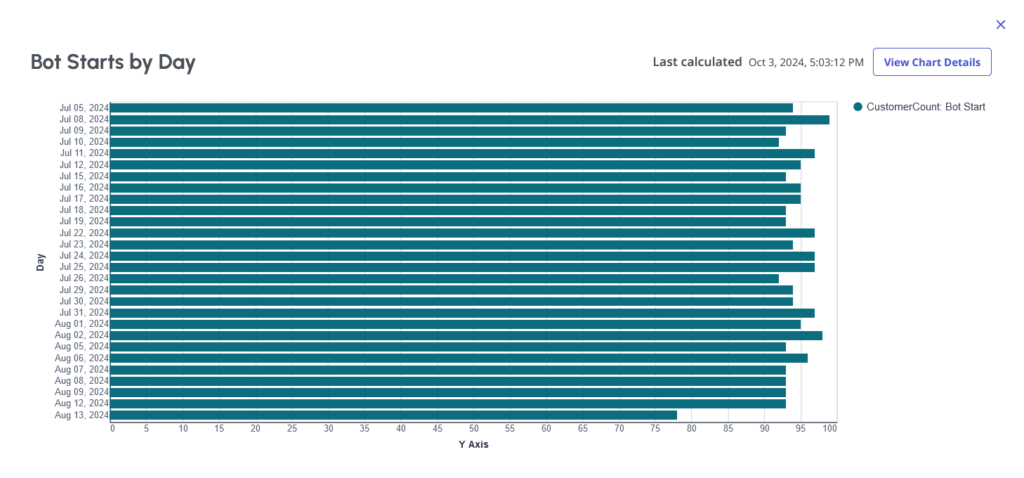
Cet exemple de graphique montre un diagramme à barres.
- Le titre est défini sur Bot Starts by Day.
- L'axe des ordonnées est réglé sur Day time value, et l'axe des abscisses est réglé sur Customers : Bot Start event sous l'onglet Data.
- Comme aucune étiquette n'est définie pour le point de données de l'axe Y dans l'onglet Settings, aucun titre d'étiquette n'apparaît.
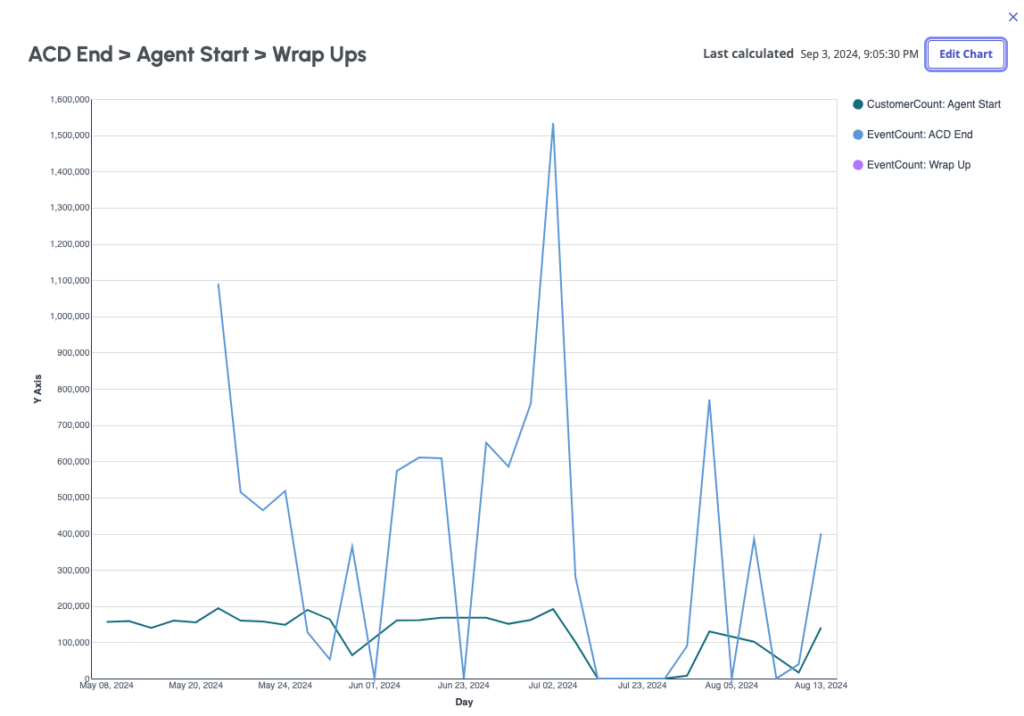
Cet exemple de graphique montre un graphique linéaire.
- Le titre est défini sur ACD End > Agent Start > Wrap Ups.
- L'axe des X est réglé sur Day time value. L'axe des ordonnées comporte trois points de données : Nombre de clients : Agent Start, EventCount : ACD End, EventCount : Récapitulation.
- Pour les points de données de l'axe Y, les étiquettes numériques sont définies dans l'onglet Settings.
Erreurs dans les résultats des graphiques
Les graphiques peuvent afficher les erreurs suivantes :
- Graphique invalide: Un événement a été supprimé du parcours.
- Nécessite un calcul: Vous n'avez pas encore effectué de calcul sur le trajet. Calculer le trajet pour que la carte puisse être mise à jour.
- Mise à jour des calculs: Le calcul précédent n'est pas valide, car le trajet a été modifié. Pour mettre à jour le graphique, effectuez un calcul.
- Aucune donnée: Il n'existe pas de données permettant de créer le graphique spécifié. Les raisons possibles sont que l'attribut sélectionné ne contient pas de données en raison d'un filtre ou de la nature de l'événement lui-même.

